Saturday, 7 October 2017

Tuesday, 21 March 2017
Perfect Gift for Mothers Day (and Fathers Day!) Tutorial

Bonus: we did the same for mothers and fathers so they had a 'matching' set (and I didn't have to come with a second idea)!
My last two years I was teaching kindergarten so I have the same kids for two years running. Therefore, I had the idea to make coasters to go with the mugs. You could easily keep this cycle going indefinitely! To make life even easier, we made two at the same time - one for Mother's Day and one for Father's Day. So much easier than gathering all the materials and making the mess twice AND it meant their coasters were much more likely to actually look good together!
 |
| Some chose to create a matching set, others made each different based on parents' favourite colours! |
These coasters came out beautifully. Not only are they pretty much failproof, but the students really enjoyed making them - not something I can say for the mugs.
Materials:
Coasters - plain white 4x4 porcelain tiles from Home Depot cost 28 cents each!!
Permanent Markers - I actually found cheap ones worked better than Sharpies (less colourfast)
Rubbing Alcohol
Materials such as eye droppers, toothbrush, toothpicks etc... to spread the rubbing alcohol
Clear spray polyurethane or varnish to seal the markers. Your choice if you want gloss or matte.
Process:
Before starting, write the student's name on the back of the tile, or have them do it themselves depending on age and ability. It was a tricky surface to write on and you want this to be legible so I chose not to make this a teaching moment! This is key - I forgot for the first couple and by the time they are dry you'll be lucky to remember which one belongs to which student!
Have students colour in the coasters one at a time. This works best if the markers don't have much time to dry so encourage them to colour quickly. Neatness is not a concern but rather the tile should be filled in with rough colour in any kind of pattern or colour blocking desired. Some students tried creating designs (rainbows, pictures...) but the reality is that it will all swirl together soon anyway!
 |
| The only 'rule': cover as much white as possible! |
I discovered that certain colours, in my case the blues, seemed to dry quickly and resisted the marbling effect. By going over those colours again at the end to make sure they were still wet made a big difference.
Give the students a small container of rubbing alcohol. 91% is recommended and we discovered why. I could only find 70% and this really didn't do much to the colours. I found some methyl acetate at 99% alcohol in Home Depot and found this too strong on its own, washing ALL the colour away instantly! I watered it down slightly and had success, but if you can find 91% rubbing alcohol you will be making your life so much easier.

Use eye droppers to squeeze drops all over the tile and create a marbling effect. I tried to encourage students to go slowly here, adding more little by little so as not to wash it out too quickly. However, some students were heavy handed and this still created an amazing effect (lighter colours washed out quicker than darker). Toothbrushes can be used to spray the liquid creating a mottled effect. Other items such as toothpicks could be used to help swirl the liquid around as necessary/desired. There really is no wrong way to do this.

If you are really unhappy with the results, use the rubbing alcohol to completely clean the tile and start over!
 |
| You can see the difference between the 'marbled' areas and the parts that still look coloured in. |
When you can no longer see marker lines (or whenever the child decides), it is ready to be put carefully aside to dry.
The next day, lay out the tiles and spray with a clear polyurethane. This will seal in the colour. I did this part to keep students away from fumes but I let me nephew help me do his. Make sure you are in a well-ventilated area and I would do 2 or 3 coats from different angles to be sure. Again, leave for a day or two.
The next day, lay out the tiles and spray with a clear polyurethane. This will seal in the colour. I did this part to keep students away from fumes but I let me nephew help me do his. Make sure you are in a well-ventilated area and I would do 2 or 3 coats from different angles to be sure. Again, leave for a day or two.
I used superglue and small squares of cork (cut of placemat) to fix to the bottom to prevent table scratches and wrote/had students label the bottom.

To package them, I created a template made from 4 circles with a diameter slightly larger that of the tile. After placing them all together by closing the centre gap, I traced and made a simpler one piece template.

Each flap was folded up, students chose a sticker to place in the middle and hold it all together, then wrote on the front.
 |
| On this coaster, you can see the mottled effect created by spraying with a toothbrush. |

Watch this video to see the process in action!
This was definitely a win-win project. So much so I had my nephew create one for each family member, and I had to stop my DECE and EA from using all the tiles to 'practise' before the kids got to them!!
Want to save this post? Pin it!

Have you ever tried marble coasters? What were your results? What gifts do you make for Mother's Day and Father's Day?
Tuesday, 31 January 2017
How to Spend Two Days in Bogotá
This blog post has moved to https://pastthepotholes.com/two-days-bogota/. It's now bigger and better so come check us out!
Saturday, 21 January 2017
Christmas in Colombia - 19 Day Itinerary
This blog post has moved to https://pastthepotholes.com/best-places-to-see-colombia/. It's now bigger and better so come check us out!
Thursday, 17 November 2016
Divali (Diwali) in Trinidad - Festival of Lights Livin' the Dream
This blog has moved to www.pastthepotholes.com. It's now bigger and better so come check us out!
Livin' the Dream
Did you know that approximately 20% of Trinidadians are Hindu? With such a large population, it's no wonder that Divali is such a big celebration here!
 |
| Beautiful street paintings - Shubh Divali |
Divali is the festival of light and symbolizes the victory of light over dark, good over evil. Here in Trinidad it is recognized as an official holiday.
The actual day coincides with the moon's phases as it is always on the new moon so it changes each year, and isn't even set until quite close to the date. We found this out the hard way when the school calendar showed it as a long weekend but then the holiday Monday was taken away (we've been kicking ourselves ever since that we weren't proactive and pre-booked a long weekend getaway!) as the Saturday was decided to be Divali.
For the week or so leading up to Divali the Nagar site in Chaguanas hosts a huge exhibition. The grounds were full of vendors, food trucks, businesses and a main stage with scheduled traditional performances. It was quite the event!
 |
| The entrance at the Divali Nagar site, Chaguanas |
On the night of Divali we decided to head to a small town in central Trinidad called Felicity. This is where everyone recommends heading to see the lights and we weren't disappointed. Almost every house puts out hundreds of deyas (little clay pots filled with oil and lit) all over their driveway, garden and walls. Some create elaborate bamboo structures to hold them. Many of the streets would get together and buy lighted arches to decorate the length of their block. The pictures don't do it justice as, of course, it was dark but it was beautiful. One block really went all out closing the street to traffic, lights everywhere, incredible paintings along the road and a stage set up for a performance later in the evening!


 |
| Deyas lit along the roadside |
As we walked the streets in the dark (a rare privilege in itself here as we are constantly told not to walk anywhere after dark) people would chat with us from their driveways. A number of people would flag us down to give us little bags full of Indian sweets! Some we found to be tastier than others but what a lovely gesture. Kerma was a favourite - kind of like sweet, sugar coated pretzels. Barfi is hit or miss depending on the recipe used - it looks like fudge but not nearly as sweet. For the life of me I couldn't remember the names of the others.


 |
| Indian Sweets |
We are hoping that next year we will get a long weekend out of this celebration and will have the opportunity to travel so it was great to have the opportunity to see the cultural side this year!
Friday, 21 October 2016
Hallway Closet Makeover - finally!
Livin' the Dream
Almost 6 years ago we looked at what would eventually become our house for the first time. My very first comment? I don't like the entryway. It was incredibly small and tight. You couldn't even stop to take off wet, muddy shoes as the person behind you would be bumping into you and unable to close door. We like the house overall and bought it but in my head, this hallway was always going to need some work! The popcorn ceiling also wasn't my favourite feature but knowing that one needed to happen at the same time as the other, it all got pushed back again and again. Finally, we had some pot lights installed and the dining room light fixture moved and needed to fix holes in the ceiling. There was no way I was putting up more popcorn so the day came.
I didn't take nearly as many photos as I should and, most disappointingly, I didn't get a before picture. (This was because I came home from England to find the hallway closet demolished by my super helpful husband!) Imagine a built-in closet that came all the way to the edge of the door leaving no room to maneouver, and all the way to the garage door. It was tight, closed off and dingy.
See the hole in the tile floor? I really had no intention of retiling the hallway so, despite wanting nothing more than to get rid of those beige tiles, my plans had to work around covering up that gap.
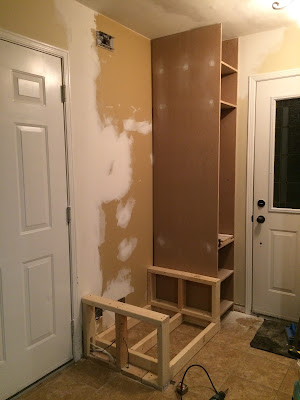
Eventually, we got all remaining framing out, re-routed the electrical (apparently the original builders decided this was a perfect place to run the stove and dryer electrical work) with the help of an electricial friend and drywalled everything back up. Thanks to some interesting framing by the builder, I ended up having to replace the drywall on half the ceiling as well as the obvious spots on the walls. Gotta love when jobs give giving! I left a piece of the original wall as this would be used as part of the bench's base and save more electrical work.
With the help of my dad and his router, and my 5 year old nephew, we made a much smaller closet. The large section in the middle is long enough to hang coats (I measured my longest coat!) and there are four spaces to fit baskets for hats, gloves and scarves.

Almost 6 years ago we looked at what would eventually become our house for the first time. My very first comment? I don't like the entryway. It was incredibly small and tight. You couldn't even stop to take off wet, muddy shoes as the person behind you would be bumping into you and unable to close door. We like the house overall and bought it but in my head, this hallway was always going to need some work! The popcorn ceiling also wasn't my favourite feature but knowing that one needed to happen at the same time as the other, it all got pushed back again and again. Finally, we had some pot lights installed and the dining room light fixture moved and needed to fix holes in the ceiling. There was no way I was putting up more popcorn so the day came.
I didn't take nearly as many photos as I should and, most disappointingly, I didn't get a before picture. (This was because I came home from England to find the hallway closet demolished by my super helpful husband!) Imagine a built-in closet that came all the way to the edge of the door leaving no room to maneouver, and all the way to the garage door. It was tight, closed off and dingy.
 |
| This is what welcomed me home after an 8 hour flight! |
Eventually, we got all remaining framing out, re-routed the electrical (apparently the original builders decided this was a perfect place to run the stove and dryer electrical work) with the help of an electricial friend and drywalled everything back up. Thanks to some interesting framing by the builder, I ended up having to replace the drywall on half the ceiling as well as the obvious spots on the walls. Gotta love when jobs give giving! I left a piece of the original wall as this would be used as part of the bench's base and save more electrical work.
With the help of my dad and his router, and my 5 year old nephew, we made a much smaller closet. The large section in the middle is long enough to hang coats (I measured my longest coat!) and there are four spaces to fit baskets for hats, gloves and scarves.

I then set about making a base for my storage bench. Because I wanted to use the existing framework, include storage space, work around some tricky corners and cover the hole in the tile, it ended up being an interesting frame job. I wouldn't follow my design and I wouldn't choose to build a bench in the same way again but it worked. Less wood would be just as sturdy but in this situation would have been a much bigger hassle trying to attach everything together.

I finished framing the bench and closed it in. I used a combination of drywall and MDF to close in all the sides and inside, needing to keep the junction boxes that were hidden in the back accessible. I gave it some trim detail to look a little more interesting and then it was time for some paint!
 |
| Already the hallway is looking larger and brighter! |
My original plan had been to sew a cushion for the top but once I got this far, it just seemed too...white. I ended up buying a piece of luon and staining it to match the large box I made for the space under the bench. I put up a shelf and ended up making the gables as I couldn't find any as simple as I wanted. You could buy them cheap at any hardware store though! Attached some hooks and a hanging rod, and voila!
 |
| The wall still needs repainting but you can see the hanging and shelf space. |
 |
| Finally, wall is repainted and a fun pop of colour added to the front door! |
I still need to build a door to close in the mini closet but that's going to have to wait, and really, it works just fine without it. When we get back into this house, the walls are going to become a grey colour and the light fixture will be updated to something more industrial/vintage. But for now, I'm in love!
Tutorial coming soon on the little wooden sign sitting on the top shelf...
What do you think? Have you got any ideas of how to make your entryway feel bigger and brighter? What part of your house have you always wanted to change?
Subscribe to:
Comments (Atom)