Friday, 21 October 2016

Hallway Closet Makeover - finally!

Livin' the Dream
Almost 6 years ago we looked at what would eventually become our house for the first time.  My very first comment?  I don't like the entryway.  It was incredibly small and tight.  You couldn't even stop to take off wet, muddy shoes as the person behind you would be bumping into you and unable to close door.  We like the house overall and bought it but in my head, this hallway was always going to need some work!  The popcorn ceiling also wasn't my favourite feature but knowing that one needed to happen at the same time as the other, it all got pushed back again and again.  Finally, we had some pot lights installed and the dining room light fixture moved and needed to fix holes in the ceiling.  There was no way I was putting up more popcorn so the day came.

I didn't take nearly as many photos as I should and, most disappointingly, I didn't get a before picture.  (This was because I came home from England to find the hallway closet demolished by my super helpful husband!)  Imagine a built-in closet that came all the way to the edge of the door leaving no room to maneouver, and all the way to the garage door.  It was tight, closed off and dingy.

This is what welcomed me home after an 8 hour flight!
See the hole in the tile floor?  I really had no intention of retiling the hallway so, despite wanting nothing more than to get rid of those beige tiles, my plans had to work around covering up that gap.
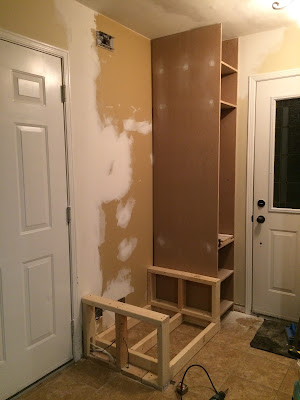
Eventually, we got all remaining framing out, re-routed the electrical (apparently the original builders decided this was a perfect place to run the stove and dryer electrical work) with the help of an electricial friend and drywalled everything back up.  Thanks to some interesting framing by the builder, I ended up having to replace the drywall on half the ceiling as well as the obvious spots on the walls.  Gotta love when jobs give giving!  I left a piece of the original wall as this would be used as part of the bench's base and save more electrical work.

With the help of my dad and his router, and my 5 year old nephew, we made a much smaller closet.  The large section in the middle is long enough to hang coats (I measured my longest coat!) and there are four spaces to fit baskets for hats, gloves and scarves.


I then set about making a base for my storage bench.  Because I wanted to use the existing framework, include storage space, work around some tricky corners and cover the hole in the tile, it ended up being an interesting frame job.  I wouldn't follow my design and I wouldn't choose to build a bench in the same way again but it worked.  Less wood would be just as sturdy but in this situation would have been a much bigger hassle trying to attach everything together.


I finished framing the bench and closed it in.  I used a combination of drywall and MDF to  close in all the sides and inside, needing to keep the junction boxes that were hidden in the back accessible.  I gave it some trim detail to look a little more interesting and then it was time for some paint!
Already the hallway is looking larger and brighter!
My original plan had been to sew a cushion for the top but once I got this far, it just seemed too...white.  I ended up buying a piece of luon and staining it to match the large box I made for the space under the bench.  I put up a shelf and ended up making the gables as I couldn't find any as simple as I wanted.  You could buy them cheap at any hardware store though!  Attached some hooks and a hanging rod, and voila!
The wall still needs repainting but you can see the hanging and shelf space.


Finally, wall is repainted and a fun pop of colour added to the front door!

I still need to build a door to close in the mini closet but that's going to have to wait, and really, it works just fine without it.  When we get back into this house, the walls are going to become a grey colour and the light fixture will be updated to something more industrial/vintage.  But for now, I'm in love!
Tutorial coming soon on the little wooden sign sitting on the top shelf...

What do you think?  Have you got any ideas of how to make your entryway feel bigger and brighter?  What part of your house have you always wanted to change?

Thursday, 20 October 2016

How I Document Learning - index cards, markbook and Google Forms!


It's that time of year again - report cards.  Urghh!  And if you're anything like me, you're thinking that you have, once again, not made nearly enough anecdotals throughout the term!  This is something I've struggled with throughout my teaching career and I've worked hard to find a system that I could actually manage successfully.  I need something that is quick, easy and doesn't require a lot of effort at the end of the term to make the notes meaningful.

Over the years, there have been three main systems that mostly worked for me depending on the grade I was teaching and technology available.


Grade Book Page - everything in one place!

A very long time ago I realised that it didn't matter if I took good anecdotals or not, if at reporting time I was left with piles of papers to look through, I probably wasn't going to use them.  I decided that I wanted my anecdotals right on the same page I recorded grades - no page flipping required!  I developed a grade book that, after a lot of cell merging and splitting and formatting issues, allowed me to record grades in all four categories (knowledge, application, communication and thinking) as well as include short anecdotals.  Here is a snapshot of what it looks like:

If you think this could work in your classroom, you can download the file here.

This allowed me to see all students' grades and anecdotals all on a double-page spread!  I would list the students down the left side, the summative assignments across the top, and by the time report card writing came around I would have up to 16 marks and anecdotals to help me write.  I used this with junior grades.  In primary, I found I needed more space for anecdotals.


Flipbooks

I got this idea from scouting Pinterest and coming across this image:

You can read the blog post from Thank God It's First Grade here.

Of course, I modified this idea by putting all the student cards on one side and leaving the other side blank for a 'code' sheet.  I had found over the years that I was either spending too much time writing too much, or developed a short hand which I often struggled to decipher when it came time to write reports.  I decided to create a list of codes for each subject that I could use to allow me to very quickly write short and sweet anecdotals AND remember what I meant down the road.  This also meant that I was able to record learning from more students in a shorter time frame.

FREEBIE!!   Click here to get a copy of my codes, or 'look fors'.


I created one folder for each subject and laminated them for durability before taping in each index card.  Unfortunately, I didn't think to snap a picture of them before packing the folders into a box but here are the codes I created.  I'll try to dig out the box and add a picture later!


Google Forms

When I switched to kindergarten I began looking for different ways to document.  Not only is kindergarten assessment made up almost entirely of anecdotals and observations, but I also had to be able to share these notes with my DECE.  The fact that iPads, iPods and smartphones are that much more accessible in the classroom also opened up new possibilities to me that in earlier attempts had been just plain frustrating.
I had used Google Forms in the past for tests but it had never occurred to me to use it for documentation until someone mentioned it at a workshop.  I was able to create a shortcut on every device we used, and at any point, anyone with access could add information.  When it came time for report cards, all the entries are compiled into one spreadsheet and can be sorted by student name, strand, date or however you wish.  This allowed me to look at all the patterning notes together if I needed, or all of 'Johnny's' notes in one spot.  If you prefer a paper copy, or want something more tangible for evidence, the spreadsheet can easily be printed too.

Here is a step-by-step guide to using Google Forms for documentation:

First log into your Google Drive account, click on the 'New' button and find 'Forms'.


You will be greeted with a pretty intuitive form creation page.
Simply click on the spaces to change the names.  I changed 'Untitled' to 'Math' and 'Untitled Question' to 'Student'.
To the right, you will be given the option of changing each question to either multiple choice, checkboxes, dropdown, short answer or paragraph.  Depending on the type of question you choose, the spaces to fill in the possible answers will appear below and you can add as many as you need.


On the far right hand side, there is a plus sign.  Click here to add a new question and repeat the process.


Make sure to include a short answer question at the end of each form to allow you to add any notes or observations.
When you are finished, you will click 'share' in the top right corner and this box will pop up:
Personally, I used the link to to open each form (one per subject area and one for behaviour notes) on the iPad, my phone and my DECE's phone and made a shortcut for each.  The home screen would then have a little icon for each form.  This way, with just one click I could easily document any learning that I witnessed as it happened without taking me away from the teaching for more than a few seconds.  Let's face it, after a long day, if I even remember something I wanted to document I probably wasn't going to actually sit down and do it!

TIP: to make it easier to find the form you need quickly, press and hold the icon to rename it.  I also changed the design/colour of each form so I could recognize the one I needed at a glance.

You must enter documentation through this link, NOT through the file saved in your Drive.  This is just where you can edit the questions, not add answers!


When you are ready to use all your amazing documentation to write reports, go back to Drive, open your file and select 'Responses' across the top.  You could click on the little green cross to put all this information into a spreadsheet to sort and organize to your heart's content :)


Here are some ideas for how to use each type of question:
Dropdown menu (choose one) - student names, expectations list
Multiply Choice (choose one) - strands, big ideas, achievement levels
Checkboxes (choose many) - skills demonstrated, checklist items, goals, success criteria
Short Answer/Paragraph - be sure to include one on each form  for your own notes and observations

How do you document your observations and record anecdotals?  Have you found something different that works well for you?

Like this post?  Pin it!